Cart is empty
Save 25%


![]()
DESCRIPTION of Wireless HDMI Extender
- Wireless HDMI Extender
- Important Notes
- These Wireless HDMI Transmitter & Receiver Set Cannot Penetrate Walls
- They're Ideal For Presentations, Customer Displays or Transmitting Within Same Room etc..
- Must Use Transmitter & Receiver Together. Cannot Use Individually
- If Using 2 Receiver Units, You Can View Output on 2 Monitors, TVs or Projectors
- Option to Purchase 2nd Receiver Unit Above
- Transmitter (Tx) Connections
- Male HDMI Plug
- Female Micro USB Socket (For Power)
- Receiver (Rx) Connections
- Male HDMI Plug
- Female Micro USB Socket (For Power)
- Resolution: Up to 1080p (Full HD)
- HDMI: V1.3
- HDCP: V1.2
- Max. Transmission Range (Without Obstacles): 50m (1 Rx), 30m (2 Rx)
- Includes 2x Micro USB Power Cables & 2x HDMI Extension Cables
- Does Not Include 5Vdc Power Supplies (Option to Purchase 5 Volt Wall Chargers)
USES of Wireless HDMI Extender
- Use to transmit output from HDMI enabled devices like a PC, laptop, set top box, games console etc.. to a TV or monitor wirelessly
- It should only be used when there are no obstacles in the way like walls, partitions etc...
ADVANTAGES of Wireless HDMI Extender
- Can works as a 1 way or 2 way wireless HDMI extender (Need extra receiver unit)
- Has a unobstructed range of 50m
- Saves on the hassle and expensive of having to run cables
- All you need is power - no need for a broadband connection
- It comes at a very competitive price for it's specification
- It can transmit your TV signal in full HD
DISADVANTAGES of Wireless HDMI Extender
- You can only use this device where you have line of sight from the transmitter to receiver
- There is no local loop out on this model
- There is no IR control on these devices
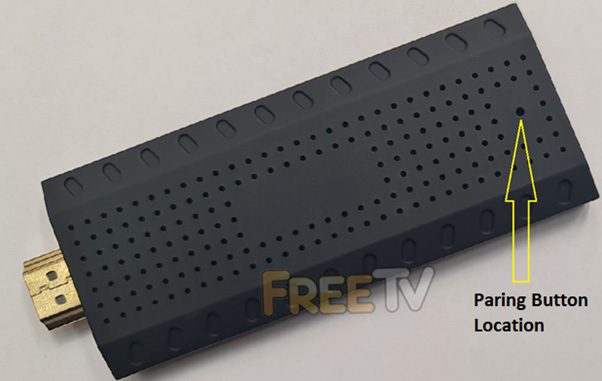
How to Pair Additional Wireless HDMI Extender
- Insert the Tx unit from the default kit into the device that you want to use to send to a TV along with connecting the USB power
- Insert the additional Rx HDMI unit into the TV (Best to be close to each other for paring purposes) along with connecting the USB power
- Wait for the Rx unit to start up and display the message on screen 'Waiting For Connection'
- At the bottom of the Rx unit there is a paring button (See picture below). Using a paper clip, slightly press and hold the button for about 10 seconds
- Go back to the Tx unit and repeat step 4. After about 5 seconds from releasing the button, the picture should appear and play as normal on the TV
Coming soon...
No posts found

