Cart is empty


![]()
DESCRIPTION of Ferguson Ariva 160 Combo Receiver
- Ferguson™ Ariva 160 Combo Receiver
- Box Contains:
- Ferguson Ariva 160 Combo Receiver
- Remote Control & Batteries
- User Manual in English
- 12 Volt Power Supply
- Definition: Standard & High Definition
- Electronic Programme Guide (EPG)
- 7 Day Electronic Program Guide (Saorview Channels)
- Now/Next (UK Satellite Channels)
- PVR Ready
- Resolution: Up to 1080p
- Support for MPEG-1, MPEG-2, MPEG-4 H.264/VC-1/AVS/VP8/HEVC/H.265 10-bit
- DVB-S2 / DVB-T2 Compliant
- Colour: Black
- Multi Language Support
- Back of Box
- Scart (TV) OUT
- Aerial IN
- HDMI OUT
- LNB IN
- Ethernet Port
- USB Port
- S/PDIF (Digital Coaxial)
- 12Vdc Power IN
- Front of Box
- Manual Operation Buttons
- Digital Display
- Available Pre-Programmed with UK Free to Air Channels - See 'List of Channels' Tab
- Supports FAT32 & NTFS
- PVR Ready (Use 250GB, 320GB USB Powered HDD or Mains Powered HDD)
- Note: Cannot Watch Terrestrial & Record Satellite Channels at Same Time & Vice Versa
- Media Player
- Video: VOB, MPG, M2T, MP4, MKV, MOV, M2TS, AVI
- Music: MP3, WAV etc..
- Images: JPG, BMP etc..
- Up to DiSEqC 1.2 Supported
USES of Ferguson Ariva 160 Combo Receiver
- HD combo receiver for receiving both
- Irish Digital Terrestrial TV (Saorview Channels)
- Standard & HD UK Satellite Channels
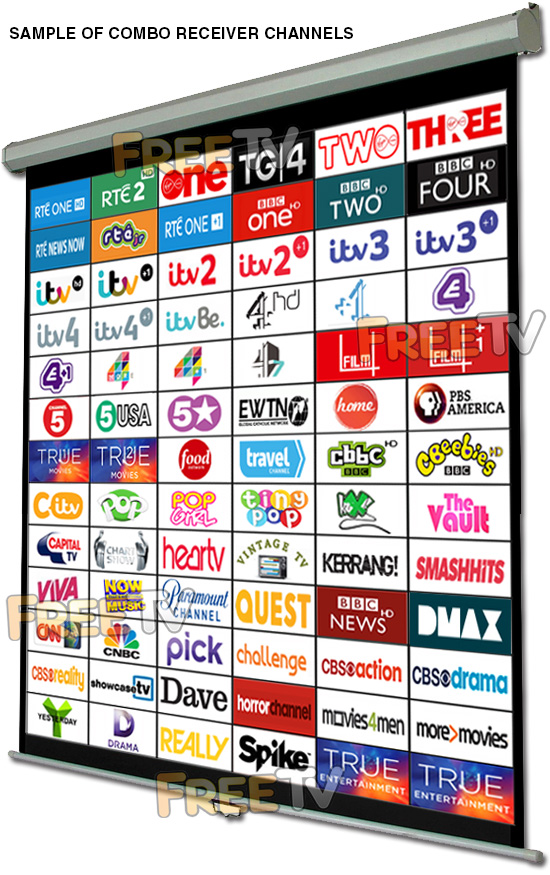
- Channel List (See List of Channels Tab) Includes
- RTE 1, RTE 2, Virgin Media One, Virgin Media Two, TG4, Virgin Media Three, TG4, RTE One +1, RTEjr etc..
- Need to tune Irish channels to your local transmitter (See video guides)
- BBC 1,2,4, UTV, ITV 2,3,4, ITV be, Channel 4, More 4, E4, Film 4, Channel 4/7 etc..
- Channel 5, CBS, Showcase, Food Channel, Travel Channel, EWTN, VIVA, Pick, Challenge, Dave, Home, Quest, Really etc..
- CITV, CBBC, Cbeebies etc..
- BBC News, Euro News, CNN, CNBC etc..
- True Movies 1 & 2, True Drama, Horror Channel, Men & Movies etc..
- Huge array of music channels
- All +1 channels where available
- HD channels include the following...
- BBC 1 HD, BBC 2 HD, BBC 4 HD, CBBC HD, Cbeebies HD, UTV HD, C4 HD, BBC News HD, RTE 1 HD, RTE 2 HD etc..
- RTE 1, RTE 2, Virgin Media One, Virgin Media Two, TG4, Virgin Media Three, TG4, RTE One +1, RTEjr etc..
- PVR Features - Add Recording with an External Hard drive
- Equipment needed: 250GB, 320GB portable hard drive or mains powered drive (FAT32 formatting)
- Allows viewer to pause & record TV shows (You can watch terrestril TV while recording a satellite channel and vice versa)
ADVANTAGES of Ferguson Ariva 160 Combo Receiver
- The Ferguson Ariva 160 does the job of both a HD satellite & digital terrestrial receiver in a single unit
- Supports both standard & high definition transmissions
- The Ferguson Ariva 160 is very competitively priced
- It future proofs your investment by meeting all the latest HD standards
- Has PVR features (ie.. Can Pause/Record live TV with addition of external storage device)
- The Ferguson Ariva 160 has a DVB-T2 terrestrial tuner so it is not only suitable for Saorview, it will also work with Freeview HD from Northern Ireland
DISADVANTAGES of Ferguson Ariva 160 Combo Receiver
- The Ferguson Ariva 160 does not support MHEG5 so no teletext on HD terrestrial channels
- More expensive than either a HD satellite receiver or a stand alone digital terrestrial receiver but cheaper than getting them separately
- It does not have an RF out ie.. it is not possible to run the picture to an additional room unless you use either an external modulator or a TRI-Link (allows you to operate box with a sky eye from another room)
Note: Most tutorial videos are from Ariva 153/154 but procedures are very similar
INDEX
- Overview & Install of the Ferguson Ariva 154 Combo Receiver
- How to Install a Ferguson Ariva 154 Combo Receiver
- How to Tune in UK Satellite Channels with Autoscan
- How to Tune in Terrestrial Saorview Channels with Autoscan
- How to Sort & Delete the Channels on the Ferguson Combo Receiver
- How to Program the Ferguson Ariva 154 with a USB Drive
- How To Manually Tune in a Satellite Channel
- How to use the EPG & Information Button
- How to Format an External Hard Drive on the Ferguson Ariva 154
- How to Pause & Record Live TV on the Ferguson Ariva 154
- How to Schedule Future Recordings on the Ferguson Ariva 154
- How to Play Back TV Recordings
- How to use the Media Player for Videos, Music & Photos
- How to Access Subtitles on the Ferguson Ariva 154
- How to Safely Remove your External Hard Drive
- How to Perform a Factory Reset on the Ferguson Ariva 154
- How to Perform a Firmware Upgrade on the Ferguson Ariva 154
Overview & Installation
Complete users guide for the Ferguson Ariva 154 Satellite Combo Receiver
The Ferguson Ariva 154 is a PVR Ready Satellite & Digital Terrestrial TV Combo Receiver
This Receiver has 2 feeds from:
- Satellite Dish (for free UK satellite channels)
- UHF Aerial (for Saorview channels)
How to Install a Ferguson Ariva 154 Satellite Combo Receiver
- Unpack the box
- Contents
- Ferguson Ariva 154 Satellite Combo Receiver
- Remote Control, 2x AAA Batteries & User Manual
- Push the lead from the Aerial into the "Aerial in" connection
- Screw the lead from the satellite dish into the "LNB in" connection
- Connect the scart lead from TV to "TV out" connection on box
- Plug in the power lead
- Turn on the power switch on the back on the box
- After 5-6 seconds the box will come on and should automatically switch TV to the correct AV channel if you are connected using a scart cable. If using a HDMI cable, you may need to use the source button on your TV remote to change to the correct AV channel on the TV
How to Tune in UK Satellite Channels with Autoscan
- Press the menu button on the remote
- Use arrow buttons to go to installation menu
- Arrow down to satellite list and press OK
- Arrow down to Astra2A E28.2 and press OK (little heart symbol will appear beside it)
- Press the back button
- Arrow down to single satellite search and press OK
- Use arrow keys to select
- FTA Only: Yes
- Scan Channel: TV + Radio
- Network Search: No
- Scan Mode: Blind Scan
- Arrow down to search and press OK
- Scan will take 5-10 minutes
- At end of search, just press OK to save scanned channels
How to Tune in Terrestrial Saorview Channels with Autoscan
- Press the menu button
- Use arrow buttons to go to installation menu
- Arrow down to terrestrial automatic scan and press OK
- Make Ireland the default country
- Make FTA: Yes
- Arrow down to Search and press OK button
- Takes a few minutes
- All Irish Saorview channels should be tuned in at this point
How to Sort & Delete Channels on the Ferguson Ariva 154 Combo Receiver
- Press the menu button
- Go to edit channel menu
- Go to TV channel list menu
- To delete channels
- Press the blue button on the remote twice
- Use arrow & OK buttons to select channels to be deleted
- You can select multiple channels for mass deletion
- To delete the channels, simply press back button twice and select yes to delete
- To move channels
- Press the yellow button
- Use arrow & OK buttons to select channels to move
- You can select multiple channels to move in a single go
- Use the arrow buttons to go to the position that you want to move channels to once they are tagged
- Once in position, press the yellow button again to activate the move
- To save, press the back button and agree to the changes
How to Program Box with a USB Drive
The videos below show how to backup and install your channel list software on the Ferguson Ariva 154.
Backup Channel List to USB Drive
- With your blank USB memory stick connected to the receiver
- Press the menu button
- Use arrow keys to go to tools menu
- Use arrow keys to go to upgrade by USB menu
- Upgrade mode: DUMP
- Press the start button
- Very quick process
- Once it reaches 100%, you can just press the back button to go back to live TV
Load Channel List from USB Drive
- Press the menu button
- Use arrow keys to go to tools menu
- Use arrow keys to go to upgrade by USB menu
- Upgrade mode: ALLCODE+BOOTLOADER
- Select ****.ABS
- Press start button
- Takes a couple of minutes
- Box will reboot and is now programmed
How to Manually Tune in a Satellite Channel
- Press the menu button
- Go to the installation menu
- Use arrows to go to TP list
- Press green button to add transponder
- Add settings for a new TP for example
- 11260
- 27500
- V
- Press Save
- If it already exists it will bring you to the correct TP
- If not it will add it to the end of your TP list
- Press blue button to search the appropriate TP
- FTA Only : YES
- Scan Channel: TV Channel
- Network Search: No
- Press the OK button to begin search
- Very quick process, takes seconds
- Press OK to confirm after search ends
- New channels will be added to the end of your channel list
EPG & Information Buttons
EPG
- Press the EPG button to bring up the Electronic Programme Guide
- Works well on the Irish Saorview channels with a full 7 day guide
- Cives a now and next channel information on UK satellite channels
Info Button
- Get information on the current programme
- Press the "INFO" Button once to get basic channel info
- Press it a second time to get programme synopsis
- Press it again to get mini EPG for the channel you are on
- Press it a 4th time to return to live TV
How to Format an External Hard Drive on the Ferguson Ariva 154
AIM: Format an external Hard drive on the Ferguson Ariva 154 Combo Receiver to utilise it"s PVR features
- Connect the hard drive to the back of the Ferguson Ariva 154 using the available USB port
- Wait a few seconds for the receiver to detect the drive
- Press the menu button
- Arrow down to the REC menu and press OK
- Go to PVR storage info and press OK
- Use yellow button to format
- Select either FAT32 or NTFS
- Select OK to begin the formatting process
- May take a few minutes depending on the drive
- DO NOT unplug drive or power off receiver when the formatting process is working
- Once complete, just press the back button a couple of times to go back to live TV
How to Pause & Record Live TV on the Ferguson Ariva 154
The video above shows how you can
- Pause Live TV
- Record Live TV
- Note: you must have an external hard drive connected to box to utilise the functions above
Schedule Future Recordings on the Ferguson Ariva 154
The video below shows how to set up future recordings using the timer menu which is particularly handy for UK satellite channels which only have a now/next EPG capability
How to Play Back TV Recordings
The video below should how to access and play back your TV recordings on your external hard drive.
The Media Player - Videos, Music & Photos
The Ferguson Ariva 154 has an excellent quality media player along with its PVR playback facilities
- Press PVR butrton on your remote control
- Use the left and right arrows to flick between the media options
- Music
- Images (photos)
- Video (Note: Does Play Xvid/MP3 AVIs)
- Once the desired option is highlighted
- Arrow down to desired photo/film/song and press OK to play/display
How to Access Subtitles on the Ferguson Ariva 154
- Use the yellow button marked "sub" on the remote
- It pulls up the subtitles menu
- Just deselect subtitles using the arrow keys in that menu
How to Safely Remove Your External Hard Drive
- Press menu button on remote
- Go to the REC menu and presss OK button
- Arrow to safely remove USB device
- Select drive and press OK
- USB drive is now safe to remove
Performing a Factory Reset on the Ferguson Ariva 154
- The video above shows how you can perform a factory reset on the Ferguson Ariva 154. You may need to do this in the case of a firmware upgrade where it is always advisable to perform a factory reset immediately after the firmware upgrade
Performing a Firmware Upgrade on the Ferguson Ariva 154
- The video above shows how you can perform a firmware upgrade on the Ferguson Ariva 154 combo receiver
Index
- How to Assemble a Zone 2 Satellite Dish
- How to Mount a Zone 2 Satellite Dish
- How to Align a Zone 2 Satellite Dish
- Running Cables & Attaching Connectors
- Installing Your Satellite Receiver
1. How to Assemble a Zone 2 Satellite Dish
List of satellite dish components
- 60cm Satellite Dish
- Wall Bracket
- Wall Tube (Arm)
- Elevation Bracket
- Dish Bracket
- Fixing Kit
- Feed Arm
Tools Needed to Assemble Satellite Dish
- 10mm, 13mm socket and ratchet
- Philips screwdriver
Steps to Assemble Satellite Dish
- Open fixing kit and select U-bolts (qty: 2), nuts (qty: 4)
- Insert the U bolts through the wall bracket
- Thread on the nuts
- Insert the arm and tighten the nuts using 10mm socket and ratchet
- The wall bracket & arm assembly is complete
- Next insert U-bolts (qty: 2) through the elevation bracket
- Loosely tighten nuts
- Attach the elevation bracket to the dish bracket
- Using bolts and washers (qty: 4), tighten with 13mm socket and ratchet
- Use the bolts and nuts (qty:4) and the Philips screwdriver to attach the dish bracket to the dish
- Use the long threaded bolt and small nut to attach the feed arm to the back base of the dish bracket so the arm protrudes in front of the dish
- Finally insert the LNB (and plastic insert) into the end of the arm and secure with a tie wrap
2. How to Mount a Satellite Dish
Equipment needed to mount a satellite dish on a wall
- Zone 2 satellite dish, complete with wall bracket and arm
- Coach bolt M8 x 50mm & 10mm plastic plugs (qty: 4)
Tools needed to mount on a wall
- Cordless drill - ideally a 24-36v SDS Drill
- 8mm, 10mm drill bits
- 10mm, 13mm socket and ratchet
- Satellite meter
Criteria on where to mount the satellite dish?
- Dish must face South East (141 degrees i.e. direction of sun 11am BST)
- Wall must be a solid surface capable of carrying weight of satellite dish
- Signal must not be blocked by houses or trees (signal is coming in at 21 degrees to the horizontal)
- Place at back or gable end of house to minimise visual intrusion
- Place as close at possible to TV room to which the satellite cables are to connected so as to minimise cable run
Steps
- Place the wall bracket and arm in the correct location
- Use the cordless drill and 8mm drill bit to drill 4 guide holes
- Use 10mm drill bit to drill holes to a depth of 60mm
- Insert the 4 plastic plugs in the holes and mount the wall bracket using the 4 coach bolts
- Tighten the coach bolts using the 13mm socket and ratchet
- Attach the satellite dish to the arm of the wall plate
- Use 10mm socket to lightly tighten the dish 'U'-bolts so they are fixed to arm but the dish can still be rotated
- Follow steps in the how to align a satellite dish guide
3. How to Align a Zone 2 Satellite Dish
- Having already mounted the satellite dish on your wall
- Attach your satellite meter to the dish LNB
- Align the dish so that it is (1) perfectly vertical, (2) pointing south east (141 degrees).
- Rotate the dish slowly over and back
- Repeat adjusting the tilt angle by 1 or 2 degrees to until a signal is found
- Tighten the U-bolts and side bolts using the 10mm & 13mm sockets
- Disconnect the satellite meter
- Connect a cable with an 'F-type' connector from the dish to the satellite box
- Check that the signal is working
4. How to Run Cables & Attach Connectors
The next step is to run satellite cable to the satellite receiver
Tools needed
- Hammer
- Snips
- Drill
- SDS Drill Bit 10X450
Equipment
- Satellite Installation Kit
Prior to beginning you must decide
- Decide how to run cable
- Connect into existing cables in the attic
- Normally neater but requires additional connectors
- May need a multi-meter to be able to identify the correct cable
- May result in longer cable runs
- Run a cable directly from the satellite dish to the satellite receiver
- Fastest and easiest way to run a cable
- Cable runs are normally shorter
- Requires the drill of a hole through a wall
- Connect into existing cables in the attic
STEPS
- If the satellite receiver is to be located next to the external wall of a room
- Use a drill and an SDS Drill Bit 10x450 to drill a hole through the wall
- Ensuring to drill from the inside out
- To conceal broken plaster use either
- Hole tidy (insert inside and out before the cable is run)
- Cable cover nailed onto the outside wall after the cable has been run
- Feed the end of the satellite cable through the wall leaving enough cable to reach the front of the satellite box
- Now start tacking the cable using 7mm clips and a hammer
- Ensuring that the cable runs down from the hole that been drilled in the wall
- This will stop water following the cable into the house
- Continue tacking the cable
- Run cable vertically or horizontally but NEVER diagonally
- If possible hide cable under the plinth or behind drain pipes (using 300mm cable ties)
- Cut the cable leaving enough length to reach the LNB of the dish
- Put on an F connector on the each end of the satellite cable
- Screw the F connector on to the LNB
- Seal the connection using Insulation tape or ideally waterproof self amalgamating tape
- Secure the cable to the dish feed arm using either 300mm cable ties or Insulation tape
- Final step is to put on an F connector on the satellite cable next to the satellite receiver
How to Put on F-Type Connectors
5. How to Install Your Satellite Receiver
- Unpack the box
- Satellite receiver
- Remote control
- Screw the lead from the satellite dish into the LNB in connection
- Connect a scart or HDMI cable from your TV to the box
- Plug in the power lead
- Turn on the power switch on the back on the box
- After 5-6 seconds the box will come on and should automatically switch TV to AV channel
- You may need to switch AV channel on TV if it does not automatically switch over
See map below for main Saorview transmitters in Ireland
The map shows the main Saorview transmitters, their coverage and the colour code (tip) of the best UHF aerial to use in that area

No posts found
INDEX
- Overview
- Free to Air
- Freesat
- Freeview
Overview
The 3 terms widely (and often incorrectly) used to describe a receiver to get the free satellite channels are as follows
- Free to Air: Received by a Generic Satellite Receiver
- Freesat: Received by an ITV/BBC Patented Satellite Receiver
- Freeview: NOT Received by a Satellite Receiver - It"s a Digital Terrestrial TV Service
Below we give full details of the differences
Free to Air (FTA)
- This is received using a generic satellite receiver and is used with a satellite dish
- It is Free to Air meaning it is used to pick up free satellite channels
- But can come with a card slot to allow it to be used for subscription services
- It is capable of working with any satellite (so long as the dish is large enough)
- Manufactured by a range of up to about 120 different companies
- Boxes can come in the following formats
- Standard definition
- High definition
- Twin feed HD to allow you to record one channel & look at another
- HD Satellite & Terrestrial Combo receiver
- Good Points
- It is non subscription
- It is very versatile in terms of channel line up and satellite"s that can be accessed
- Huge range of different boxes
- Generally cheaper than official freesat boxes
- Drawback
- Unlike freesat
- It does not automatically update if their is a frequency change
- or new channels becomes available
- Getting spare remotes can sometimes be an issue
- Unlike freesat
- Main channels include (on astra 2, but totally flexible):
- BBC 1,2,3,4,
- UTV, ITV 2,3,4,
- Channel 4, E4, More 4, Film 4
- 6 News Channels, 7 Childrens, 8 Movie channels etc
- We stock these in our free to air satellite receiver section
Freesat
Main points
- This is a satellite receiver
- Works in conjunction with a satellite dish
- It meets the Freesat standards set out by ITV/BBC
- It will work anywhere in Ireland from a 60cm satellite dish
- It comes in range of types
- Freesat SD: SD with no hard drive
- Freesat HD: HD with no hard drive
- Freesat+ HD: Twin feed, HD, with hard drive, series link, 7 day EPG etc
- What makes Freesat special?
- It is non subscription
- It has a standard channel line up (program box with a UK Post code)
- It automatically updates if there is a frequency change
- or new channels becomes available
- Easy to get spare remotes
- Drawbacks
- It is generally more expensive than free to air boxes
- It is not as flexible - i.e. you can"t decide the order of the channels in freesat mode
- Only works off the Astra 2 at 28 East satellite
- Main channels include
- BBC 1,2,3,4,
- UTV, ITV 2,3,4,
- Channel 4, E4, More 4, Film 4
- 6 News Channels, 7 Childrens, 8 Movie channels etc
- We stock these in our Freesat Satellite Receivers section
Freeview
Main points
- This is a terrestrial service (NOT a satellite service)
- Works with UHF aerial rather than a satellite dish
- It meets the Freeview standards set out by ITV/BBC
- It does not generally work in Ireland (Except along NI border & East coast)
- We do not stock Freeview boxes
- What people generally mean when they say Freeview is that they are looking for either
- A Free To Air Receiver
- A Freesat Receiver

